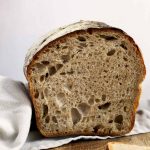
Sourdough Bread Recipe for Beginners
Everyday sourdough bread recipe for beginners using stretch and fold technique - learn the basics and create your first amazing homemade sourdough loaf with just a spoon of active starter; no kneading required and without a proofing basket.
Servings 12 slices
Calories 176kcal
Ingredients
Leaven
- 2 teaspoon Active Sourdough Starter
- 55 ml Water
- 55 g Bread Flour
Dough
- 320 ml Water
- 495 g Bread flour
- 17 g Butter softened (optional)
- 10 g Salt
Instructions
The night before making your bread
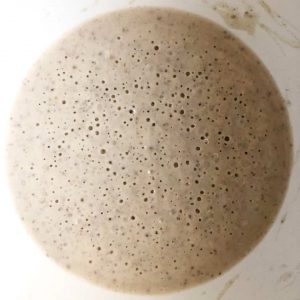
Prepare the leaven
- Take 2 teaspoon of your starter (17g) and mix it with 55ml of water and 55g of bread flour in a bowl.
- Cover and leave to ferment overnight.
The next morning
Hydrate the flour (autolyse) 9am
- Mix 320 ml of water with the 495 g bread flour. Combine both components until just incorporated, don’t knead. Ensure that you have no dry bits of flour left in the bowl.
- Cover the bowl and leave for at least 30 minutes (1 hour is ideal) so the water can hydrate the flour. This is called “autolyse”, but it’s simply the process of allowing the flour to become hydrated.
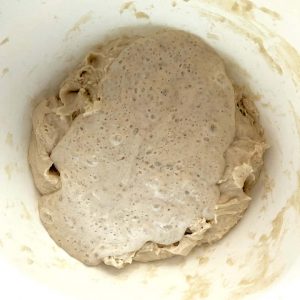
Making the dough 10 am
- Pour your active, bubbly leaven over the hydrated flour, then sprinkle the salt all over the top and work the leaven into the hydrated flour. The dough is very messy at this point. At first, it looks like the two mixtures struggle to blend but they will eventually combine.
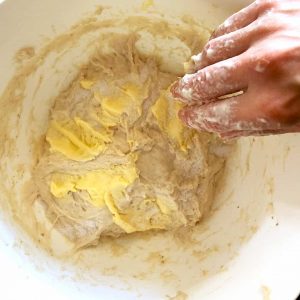
- Optional - adding butter: Once your hydrated flour and leaven is combined, scatter the softened butter over the dough. Then continue stretching and folding until all the butter has been mixed in.
- Cover the bowl and leave to rest for at least 15 minutes.
Stretch and Fold 10:30 am
- Perform 4 rounds of stretch and folds spaced out 15 minutes apart.
- Grab back of the dough, pull up and fold the dough down towards yourself; turn the bowl a quarter-turn.
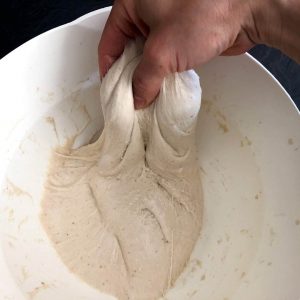
- Repeat the process with further stretch and folds.
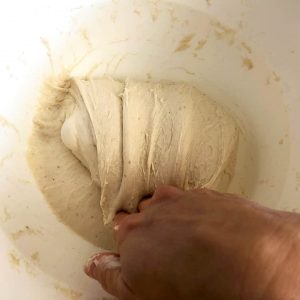
- Do the stretch and fold for each of the four sides (top, bottom, left and right).
Bulk Fermentation 11:30 pm - 2 pm
- After 4 rounds of stretch and folds, leave the dough to rest in the bowl for around 2-3 hours or until it has approximately doubled in size.
Shaping 2 pm
- Line a tin with baking paper.
- Lightly dust the counter, and the top of your dough with flour.
- Remove your dough from the bowl with the floured side facing down on the countertop.
Option 1: Shaping for a 2lb loaf tin
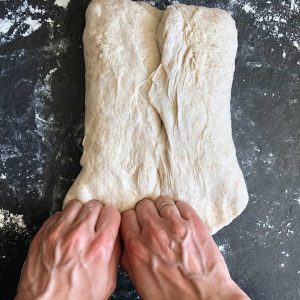
- Lightly flour your hands, gently shape the dough into a rough rectangular shape approximately double the length of the loaf tin (using your fingertips and gentle pulling).
- Grab the left side of the dough, give it a gentle tug and fold ⅓ over to the right side.
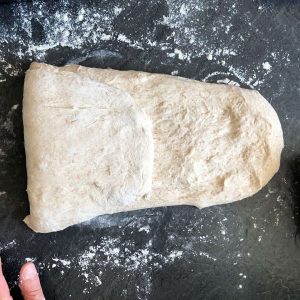
- Grab the right side of the dough, give it a gentle tug and fold ⅓ over to the left side.
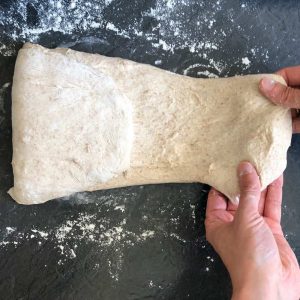
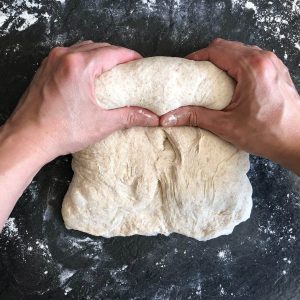
- With your fingers press the layers of dough along the bottom edge together to create a straight seam.
- Start rolling the dough from the top edge towards the bottom seam. Tighten it with your thumbs along the way and create an oval “sausage” shape.
- Position the oval shaped dough with the seam side down and gently tuck the left and right side in.
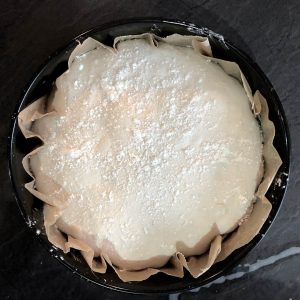
- Quickly without a hesitation transfer the dough (seam side down) into the loaf tin and lightly dust with flour. Cover the tin.
Option 2: Shaping for a 20cm cake tin
- Lightly flour your hands, gently spread the dough with your fingertips into a rough round shape.
- Grab the back edge of the dough, gently pull.
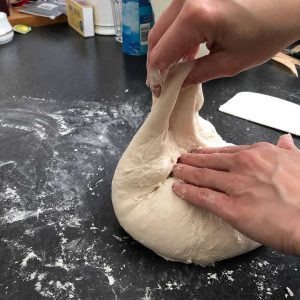
- Fold towards the middle.
- This fold creates a corner at 1 o'clock which you will then grab, pull and fold into the middle.
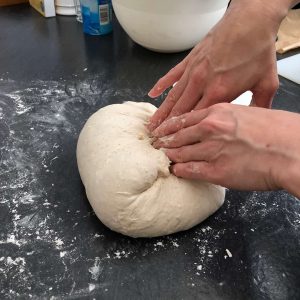
- You will repeat the grab, pull, and fold movement working your way around the dough
- Work your way around the dough twice so you are left with a nice round ball.
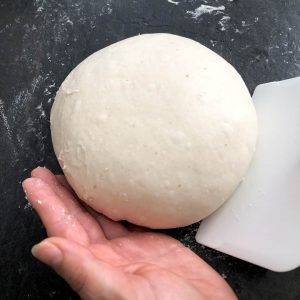
- Pick up the ball you have made and flip it seam side down.
- With a hand cupping motion, spin the dough ball on the counter as this will make the ball tighter. You can use a scraper if you feel it helps with twisting.

- After you have created some tension in the dough, the top side will be visibly smoother, quickly without a hesitation transfer the dough (seam side down) into the tin.
- Lightly dust with flour and cover the tin.
Final Prove 2:30 pm - 5 pm
- Leave the dough proving for 2-3 hours, or until you can see that the dough fills your baking tin. To see whether the dough is ready you can wet your finger and poke the dough. If the dimple springs back quickly, leave it rising longer. You know it's ready when the dimple is slow to spring back, and a small dimple remains.
- You can use any lined tinned you have to hand.

Baking 5 pm
- Preheat oven to 230 C
- Dust the top of your loaf with flour and score the bread so you control where the bread spits during the oven spring (scoring is optional, only do it if you have a very sharp knife)
- Bake for 25 minutes at 230, then reduce the temperature to 200 C and bake for another 20 minutes. The top should get quite dark brown and crusty.
- Allow the bread to cool for at least an hour before cutting.
Notes
Please note that the timings given here about the duration of the bulk fermentation and proofing take are only a guide of how long this took in our kitchen. If your house is warm like ours ( 22 - 24 C) 2 hours will be sufficient, however, if your place is much cooler it will be necessary to wait longer for the dough to double in size. A good tip is to let the dough rise in an oven with the light turned on or place it in your airing cupboard.
Nutrition
Calories: 176kcal | Carbohydrates: 33g | Protein: 6g | Fat: 2g | Saturated Fat: 1g | Cholesterol: 3mg | Sodium: 336mg | Potassium: 46mg | Fiber: 1g | Sugar: 1g | Vitamin A: 35IU | Calcium: 6mg | Iron: 1mg